
There are endless versions of Shabby Chic around! I love the cozy uniqueness in the layers of scraps, buttons or ruffles.
I have some fun and simple Shabby Chic ideas for you to get creative with, projects that you can create with your own personal touch!
16 Inch Shabby Chic Pillow Sham, with Lace
Materials:
1 16 1/2” x 10” Rectangle
1 16 1/2” x 6 ½” Rectangle
Spare Doilies
Buttons
2 10 1/2” x 16 ½” Rectangle for Back
Seam Allowance: 1/4 Inch
Sew the longer side of the 6 1/2” piece to the 10” piece, right sides together. Press seams to one side.

Lay your doilies on the right side, centered over the seam. Pin the edges of your doilies in place to hold for sewing. Topstitch around the edge.

Every doily is different, some may look better sewn 1/2” from the edge, some sewn 1/4" from the edge. I try to sew on an area of the doily that has a tighter weave, so more stitches catch and it holds better.
Hem one long edge on two of the 10 1/2” × 16 1/2” pieces. Hem it 1/2". Lay the pillow front face up. Place the hemmed pieces on top, face down. The pieces should overlap. Sew around the full outer edge.

Turn inside out; poke out the corners; insert your pillow. Enjoy!
16 Inch Shabby Chic Pillow Sham, with Buttons
Materials:1 16 1/2” x 10” Rectangle
1 16 1/2 ” x 6 ½” Rectangle
1 22 1/2” x 4” Rectangle
16 1/2” of Lace Trim
Buttons
2 10 1/2” x 16 ½” Rectangle for Back
Seam Allowance: 1/4 Inch
Sew the long side of the 6 1/2” piece to the 10” piece, right sides together. Press seams to one side.
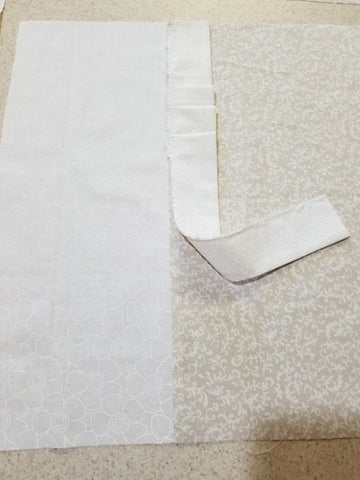
Fold the 4” strip in half lengthwise. Press flat. Serge the unfinished edge to prevent fraying. Sew in three even tucks, 3/4" deep (total of 1 1/2" pulled into each tuck). Iron to one side.

Sew the strip right along the seam.
Sew lace trim right over top, hiding the serged edge. Decorate with buttons!

Hem one long edge on two of the 10 1/2” × 16 1/2” pieces. Hem it 1/2". Lay the pillow front face up. Place the hemmed pieces on top, face down. The pieces should overlap.
Sew all the way around the outer edge. Turn it right side out; poke out the corners; insert your pillow. Enjoy!
Click here to read more about Good's Store serving as a fabric store in Lancaster, PA.
I love the simplicity of your posts. The instructions are very thorough.
Thanks Susan!