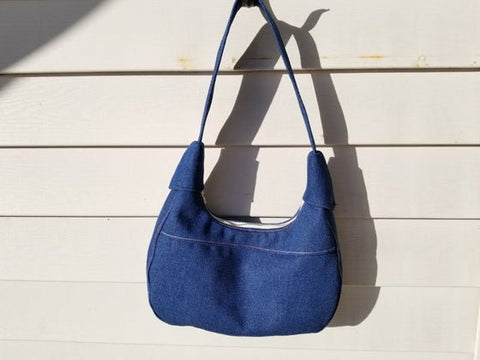
Sew your own denim purse! This cute little handbag has a shoulder strap for easy carrying and a zipper in the top so your wallet and phone can stay safe. You can find dark navy denim fabric here, or bleached denim fabric here. Any cotton fabric will work well for the lining.
Materials needed:
¼ yd Outer Fabric
¼ yd Fabric for Lining
10” Zipper
Finished Purse Size: Approx. 10” × 6”
Cut out the pieces for the purse, using the pdf pattern you can view or print by clicking here. Print both pages full size on 8.5 x 11" paper. Follow the instructions on the pattern for cutting out the pieces.

Step 1
Sew the yoke onto the bag front, right sides together.

Step 2
For decoration, you can turn the seam allowance upward and top stitch.

Step 3
Sew the 28” strip of the denim between the front and back pieces, around the side edges, right sides together. This makes the bag wider, instead of flat. You may have to trim some off the end if it seems too long. I pieced mine, that’s why there is a seam showing on the bottom, you wouldn’t need this seam. It’s a little difficult, but you can also top stitch the seam allowance around the bag, so it lays flat.

Step 4
Gather the top and bottom of the lining piece. You want it to be the same width as the piece for the outside after it’s gathered. Sew over top of the gathers along the bottom edge to keep it from moving when you sew the edge piece on.

Step 5
Sew the inside yoke onto the gathered piece. Turn up the seam allowance and top stitch.

Step 6
Sew the 28” strip of the lining material between the front and back lining pieces, around the side edges, right sides together. You can also top stitch the seam allowance around the lining too.

Step 7
Set the lining right side out inside the denim. Denim should be right side in.

Step 8
Sew the zipper in between the two layers, zipper teeth facing outward. Make sure the zipper tab is facing out toward the denim, not in toward the seam. After you have both sides sewed in, turn right side out through the hole left in the end, by the side of the bag. This part is a little tricky. You can iron or top stitch alongside the zipper on the outside. This will make the bag easier to zip.

Step 9
Take the 4 ½” strip, fold in half lengthwise, and sew ¼ seam allowance tucked in on the open side, right side out, with the allowance on the inside. Top stitch along the other side to make it look uniform. This is the strap. Tuck one end of the strap into the opening at the bottom of the zipper. It looks unfinished at this point, but once you sew the fabric bells over top, you won’t see the unfinished edge.

Step 10
Prepare the fabric bells. Sew the sides together, right side facing in. After sewing, rotate the bell so that the seam is directly in the center of one side. Hem around the bottom of the bell.

Step 11
Slide the bells onto the strap, right side out, small ends together facing the center. Sew the other end of the strap into the other opening at the top of the zipper. On the first bell, turn it inside out, position the seam facing the outside edge of the purse, and sew onto the strap, directly above where the strap is sewn into the purse. Turn the bell right side out down over the unfinished looking part. Do the same for the other bell.
This makes a great church purse or doll diaper bag for little girls.

Click here to read more about Good's Store serving as a fabric store in Lancaster, PA.


Comments (7)
I made several of these for Christmas gifts this past year! They were an instant hit, with requests from other folks for some! Thanks for sharing this pattern!
Wow, thank you for sharing this tutorial! I can’t wait to try it.
Awesome. Can’t wait to try it.
What a lovely pattern!! Please send out more!
Thank you for sharing this pattern! The purse would be great for a teen or tween! Please share more patterns.
Can’t wait to make this. Haven’t seen in awhile but this looks like a great project.
Best pattern I have seen in a long time. Thank you.
Cannot wait to make one.