
Hello Readers!
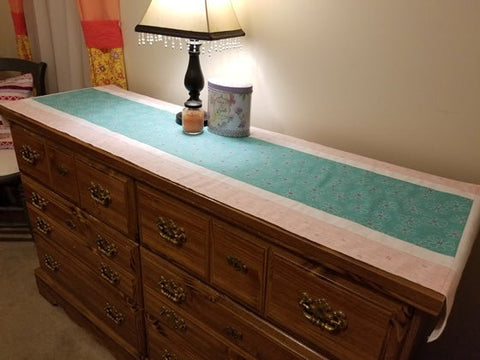
I recently got a new dresser at a used furniture store, for only $40. It looks good, but I've always liked having a dresser scarf of some kind on top, to keep the top nice. So I made a simple pieced one and thought I’d share it with you so you could refresh your dresser for spring too! Since I will likely wash my dresser scarf, I used some prints from the newest shipment of Tropical Breeze fabric because they wash better than 100% cotton in my opinion.
Materials & Tools Needed:
¼ yd. each of 3 coordinating prints
1 yd. white poly cotton for the backing, cut in half at the 18” points, sewed together in the center to make one long piece
Cutting Mat & Rotary Cutter
Instructions:
Step 1:

Trim off the ruff edge of the ¼ yd pieces

Cut one piece into 2” strips for the inner edge. One of these, cut out two strips 12 ¾” long for the ends.

Cut one piece into 3” strips for the outer edge. One of these, cut two strips 17 ¼” long for the ends, and 4 blocks 2” long to add to the sides.
Step 2:

Sew the narrow strips onto both sides of the center.

All the seams in this project can be ironed in towards the center.
Step 3:

Sew the short narrow strips onto both ends of the center.

Press seams.
Step 4:

Sew the 2” blocks onto the ends of the long wider strips.
Step 5:

Sew the wider strips onto both sides.

Press seams.
Step 6:

Sew the short wider strips onto both ends.

Press.
Step 7:

Center the pieced scarf face up on the white backing, which is laying face down. Pin in place.
Sew around the edges, ¼ from the edge. Trim off any extra white that sticks out past the top.
Step 8:

At this point, you could sew binding on the edges to finish your dresser scarf. I simply serged the edges.
Step 9:

Another unique touch would be adding lace around the edges!
The finished project, on my new dresser.

Click here to read more about Good's Store serving as a fabric store in Lancaster, PA.
Comments (0)
There are no comments for this article. Be the first one to leave a message!