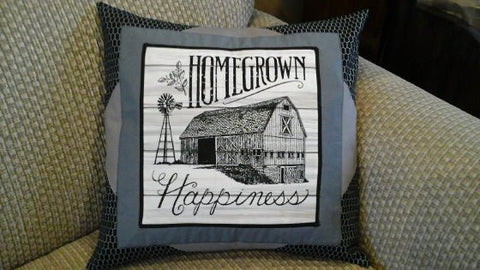
Since we love fabric at Good's Store, we're starting a regular how-to sewing blog! Karen Lapp, a long-time Good's Store employee, is going to start us off with this easy pillow cover project. Karen used fabrics from Moda's Homegrown Collection, but of course, you can use whatever you have on hand.
How to Sew an 18" Farmhouse Pillow

1. For this project you will need 5/8 yd of a main fabric, a 1/2 yd each of 2 accent fabrics and a preprinted panel. For my project here, the black “chicken wire print” is the main fabric, blue and brown fabrics are the accents, and I’m using a Moda Homegrown panel for my panel. You will need an 18" pillow form to stuff your pillow. Of course, you can use any fabrics you like.

2. Cut an 18 1/2" square from the main fabric making sure that the printing is straight. A rotary cutter, cutting mat and straight edge ruler is recommended.
From each of the 2 accent fabrics, cut 2 14" squares.

3. With right sides together sew a 1/4" seam around all four sides of each color set. Trim corners. (refer to photo)

4. Carefully cut a small slit in the center of the back layer of fabric making sure not to cut through both layers. (refer to photo) Turn the squares inside out. Press.

5. Repeat steps 2 - 4 for the preprinted panel. The measurement is determined by the panel that you choose to use. The image that is shown on our sample was cut to 11". Be careful to center your design before cutting it out.
6. Layer the fabrics the way that you want the finished product to appear. (see photo) Mark the center of each side of the main fabric with a pin. Place one of the accent fabrics on top of the main fabric matching the points with the pins in the main fabric. Using matching thread, topstitch this layer in place. (see photo)

7. Center the second accent fabric on top of the previous layer. Position the same as the main fabric. Topstitch in place. (Your pillow front will have 4 different “layers”: 1 panel, 2 accent fabric, 1 main fabric.)
8. The panel piece is centered on the top of all the layers. Topstitch in place. (I topstitched double wide narrow black binding on the panel piece as an accent, but that is optional.)

9. From the main piece cut 2 pieces of fabric 18 1/2" by 14". Hem one side each of the 18 1/2" pieces. (see photo). Press for a neat hem. These are the pillow back pieces.

10. With right sides together, lay the pillow back pieces on top of the pillow front making sure to overlap the hemmed edges a couple of inches (see photo)

11. Sew around all sides. Trim corners and any excess fabric. Press. Turn pillow right side out. Insert an 18" pillow form. ENJOY. (If you don’t have a new pillow form on hand, you can recycle an old pillow with a tattered or stained cover.)
This project could also be used to make a wall hanging.

Click here to read more about Good's Store serving as a fabric store in Lancaster, PA.

Comments (4)
Nice
Really neat – like colors
You did a beautiful job! Encouraging folks to sew is a great thing to do, otherwise it may become a lost art.
Simply beautiful